The Cellist
Issue #2
How To Bow For Sound
As mentioned in the last issue, yes, you need intonation, the ability to get from one note to another, a good vibrato, and many other left-hand techniques. But the great sound that you hear in the concert hall and on recordings comes from your bow. Musicality, nuance and expression belong to an area that is difficult to teach: they come from within. But all the tools to have at your disposal to express your ideas of the music you are playing are quite learnable if you pay attention to details, and consistently practice the basics. I can promise you an improved sound in just a few weeks if you follow these ideas and practice regularly.
First let's add a slightly more advanced detail to what was presented in the last issue.

Photo 1
Photo 1 shows the beginning of a bow-grip that uses just the thumb and two middle fingers. My purpose here is to demonstrate that a lot of the weight needed in a great bow stroke comes from these two fingers.

Photo 2
The index finger (photo 2) adds more weight but also directs it: as the bow moves toward the tip, the index finger transfers more weight to the end of the bow since the hand - especially the two middle fingers - are no longer directly over the strings.
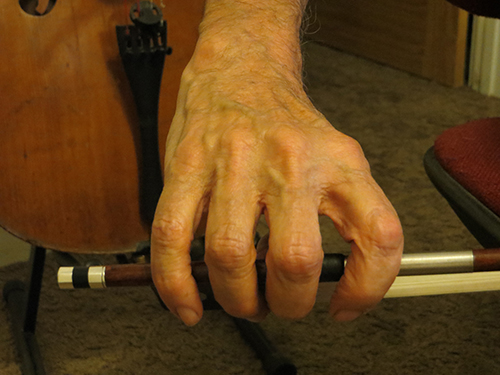
Photo 2a
The little finger (photo 2a above) can also add weight especially in big forte passages near the frog. But it also has the job of relieving weight as the bow nears the frog and you want to maintain your dynamic without a crescendo on an up-bow.
Practice: Achieve a forte sound by doing long bows, let's say 8 times on each string, on open strings with good weight and medium speed. Locate your bow about half-way between the fingerboard and the bridge. (see photo 3, below)

Photo 3
Feel the weight of your hand and arm pull the hair into the strings and consequently the sound from your cello. Keep the dynamic (the volume) constant from frog to tip and then back. You'll eventually notice the activity of the index and little fingers transferring weight and removing weight depending on what part of the bow is in contact with the string.
Sound-Point
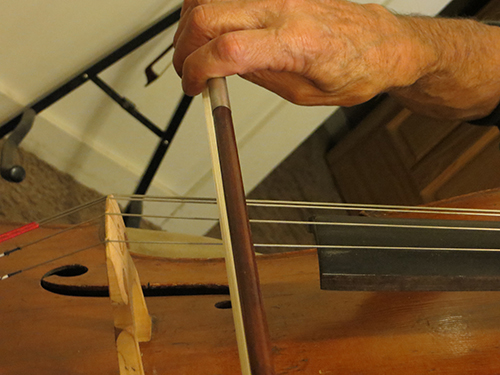
Photo 4
The "sound-point" is the point on the strings, somewhere between the end of your fingerboard and your bridge, where you place your bow. Many cellists' default sound-point is much closer to, if not directly over, the fingerboard. Look at the end of your fingerboard and see how much rosin has accumulated there. There are times when that's the place you want your bow to be, but not often enough to cause a noticeable rosin deposit. Your default sound-point should be within a centimeter on either side of the halfway point (midpoint) between the fingerboard and the bridge. (See photo 4 )
Practice: Play either a 3 octave C-scale (preferable) or a 2 octave G-scale, but make sure your choice is a scale you can easily play. If neither of these is easy, use a 2 octave D-scale. If a 4-octave C-scale is easy for you, use it. The important thing here is to have something relatively easy to play that takes you to different heights of the fingerboard. (Remember one of our basic rules: the brain will do only one difficult thing at a time).
Set your metronome at c.72 . Play your scale, one bow per note, three metronome clicks per bow. Use as much of the bow as you can while playing forte, keeping your weight in the bow through the bow change. Begin with your sound-point about 1 cm toward the fingerboard from the midpoint between the fingerboard and the bridge (Photo 4). Now play the scale beginning at the midpoint: now 1 cm closer to the bridge. Now move the bow slightly closer to the bridge each time you repeat the scale.
Notice how the sound increases in focus the closer the bow gets to the bridge. Notice also that the higher you are on the fingerboard, regardless of which string you are playing, the more you need to move the bow closer to the bridge.
You may feel that, as you move the bow closer to the bridge, your sound becomes more strident, less rich and chocolate-like. And that, as you move the bow toward the fingerboard, the richness and chocolate may seem to return, as well as the cello being easier to play. Here's basic rule # 3: The sound you hear from behind the cello is not the same sound you would hear if you were in front of the cello. Many cellists make the mistake of shying away from the focused sound achieved when the bow is near the bridge because they're not hearing the cello from out front. "Projection", a term often used in discussing the merits of a concert cello, is for the most part this focused sound which you can achieve with the cello you now play. The sound you produce closer to the bridge is the one you need to believe in, even if at first you don't like it in your practice room. And the higher you go on the fingerboard, the closer to the bridge you need to be.
Luthier's tip. Depending on your cello, you can maximize this focus by using a Belgian style bridge, some soloist strings on your A & D, and some tungsten G & C.
The Weight & Speed of your Bow.
Forte

Photo 5
Try this. Bow an open A string as before with a long bow, aiming for a big forte sound. Choose your sound point, as before, about 1 cm toward the fingerboard from the midpoint between the fingerboard and bridge (see photo 5, above). Bow 4 times.
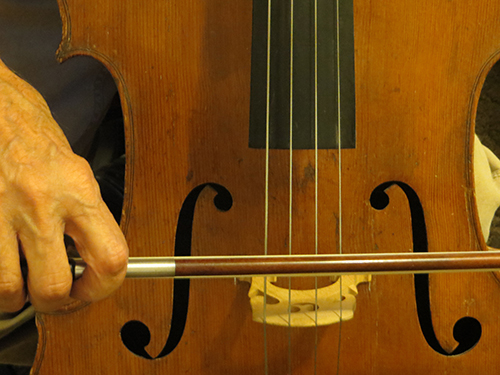
Photo 6
Now do this same exercise about 2 cm closer to the bridge (photo 6, above). Notice how your bow must be heavier and slower or else it will "skate" (whistle over the string without actually engaging it). Repeat this exercise, each time moving slightly closer to the bridge until the sound tells you that it doesn't make sense to go any farther. The closer you get to the bridge in this exercise, the better you are becoming at producing big concert sound. Repeat on all strings.
Now try this fingering a 4th finger D on the A string in first position. Notice that it is easier to play with your bow closer to the bridge than it is playing an open string. Try it with higher notes and different strings. Try it with pieces you are playing. The easier the piece (maybe try one you mastered 6 months ago) the more you will be able to concentrate on your sound. Adding vibrato will give you an even bigger color and dynamic pallet. Continue to pay attention to your grip - much easier to apply this added weight with a good grip - and pay attention to your bow change. Remember, no lifting or dead air space at the change.
Piano
One of the big mistakes cellists make in playing a soft passage is using a slower bow. True, a faster bow in this case can result in louder sound, but a too-slow bow will definitely sound wimpy and amateurish.
On the open A string choose a sound-point just to the bridge side of the fingerboard. (See Photo 7)

Photo 7
Tilt the bow toward you so that only the near edge of the hair is in contact with the string. Now set your metronome at 100 and do long bows at 3 clicks per bow. Play as lightly as possible. Now do the same thing with all your weight off the bow, except at the bow change so there's no air space. Now try to actually lift some of the bow weight so that the effect is even lighter. Keep your bow moving. If you slow it down at all, you must lighten the weight. As always be listening for sound: you want a heart-rendingly beautiful sound that is almost whisper quiet. Now try fingering different notes on different strings and add some vibrato for even more beauty.
For more soloistic color, try your piano dynamic placing your bow at various points closer to the bridge, adjusting your bow speed & weight accordingly. Keep your notes easy to play so that the full attention of your ear can be directed at your sound.
If you want to progress even faster with your sound, periodically record yourself. If you do this be careful not to beat yourself up over the things you don't like (the recorder will probably be responsible for some of this). Concentrate on making smooth focused sound and leave other problems for a different practice. The brain can only focus on one difficult thing at a time.
These are things that should be practiced every day. It is one thing to understand the techniques by reading them and trying them a couple times, but it takes consistent and regular practice to automatically make the sound you want simply by responding to your ear.
The techniques I'm explaining are mechanical, but cannot great sound cannot be produced by mechanics alone. Your ear, and the way it relates to the feel of your bow, is what you're really trying to develop. You first hear the sound in your head, then you reproduce it using your mechanical skill all the while monitoring it with your ear, then adjusting until you are producing exactly what you want. Therefore your ear must always be available in any technique you are trying to improve, which is why bowing techniques need to be practiced on a piece or etude where you're not struggling for notes. Once again, the brain can only focus on one difficult thing at a time. As you get better and better with sound, these are the techniques used for, effortlessly and without thinking about them, expressing the music and your personal interpretation of it.
REVIEW OF BASICS RULES TO DATE.
1. Every anatomy is different
2. The brain can only focus on one difficult thing at a time.
3. The sound you hear from behing your cello is the not same as the sound you would hear if you were in front of the cello.
In the next issue we'll show you how to Achieve a CD-Quality Vibrato.