The Cellist
Issue #7
Injuries: Their Causes & Cures
Summer courses in instrument restoration have often taken me to New Hampshire where the program there included, beside the restoration course, violin-making and bow-making classes. The course I took didn't have space for any instrument larger than a violin, so my cello work had to wait for the less populated evening hours. It was during these hours that I finished what I had intended and I wanted to listen to someone else playing the cello I had worked on. As it happened there was a woman taking the bow-making class across the hall who was a section cellist in a major U.S. symphony.
I introduced myself and asked her if she would do me the favor of playing a cello. She was very nice about it but apologized profusely: then she took off her jacket revealing an arm that was taped from shoulder to wrist. She was in almost constant pain, she said: she reserved all her cello time for rehearsals and concerts, soft pedaling as much as she could to try to coax a few more performing years from her body. I asked her how many other cellists, or string players in general, were playing with injuries. A lot, she said.
Most non-musicians smile in disbelief when it is suggested that serious string musicians are as prone to injuries as serious athletes. It is only in the past 10-15 years that we as musicians are being looked at by the medical profession and the various ways we use our bodies being evaluated. Music performance injury study has finally begun to be its own science.
As a musician with injuries myself, and as a teacher of students some of whom also tend toward injuries, I have consulted many physicians and physical therapists as well as journal articles over the past several years. Below are ideas that I have compiled and successfully used for some time.
Thumbs
In my view, preventative measures are not only a good prevention but also necessary for the cure for playing injuries. And the major cause of these playing injuries is, I believe, repetitive movement under tension. Tension causes us to repeatedly do things that our body does not comfortably do, among other things, squeeze our left hand on the neck of the cello and our right hand on the bow. Let's look first at the left hand.

Photo 1
Photo 1 shows the hand squeezing the strings - notice that the thumb is not bent causing strain primarily on the large joint just before the wrist. Let's say you play mostly slow things - say one note per second, 80% in positions I-IV, and that you practice a full hour each day after breaks, changing your music, petting your dog etc, and you do this 5 days each week. That's 2880 squeezes, or strains on your thumb, each playing day or nearly 750,000 per year. That's a lot to ask of your thumb joints.

Photo 2
Photo 2 shows the left hand with a space between the thumb and the neck: while this is not how you'd actually play the cello, it is possible to stop the string properly by use of just the weight of your hand and arm. Try it, then try to have the thumb just grazing the varnish on the neck - at least not squeezing (photo 3) - and bent: Something else that many cellists won't do but will reduce a lot of strain in this area is making sure your string height is relatively low and your fingerboard concavity in close to flat.
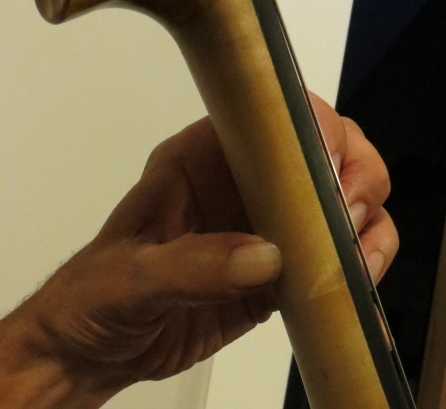
Photo 3
It may mean an extra bridge or maybe two and a fingerboard plane, and you may get arguments from both luthiers and cellists on this, but the reduced strain and the increased ease of play will do a lot for both your health and your progress.

Photo 4
Photo 4 shows a bow grip that squeezes the bow and puts a similar amount of strain on the right hand. Notice also the unbent thumb. It is difficult for beginners and intermediates to grip a bow loosely but it is definitely in the best interest of your health to do so. The first thing is to bend your thumb: you may also want to add a piece of latex tubing or something similar to your bow (photo 5) to cushion things. While the thumb-squeezes in the right hand are not as numerous, they are much longer in duration and right thumb injuries are more common than left thumb.
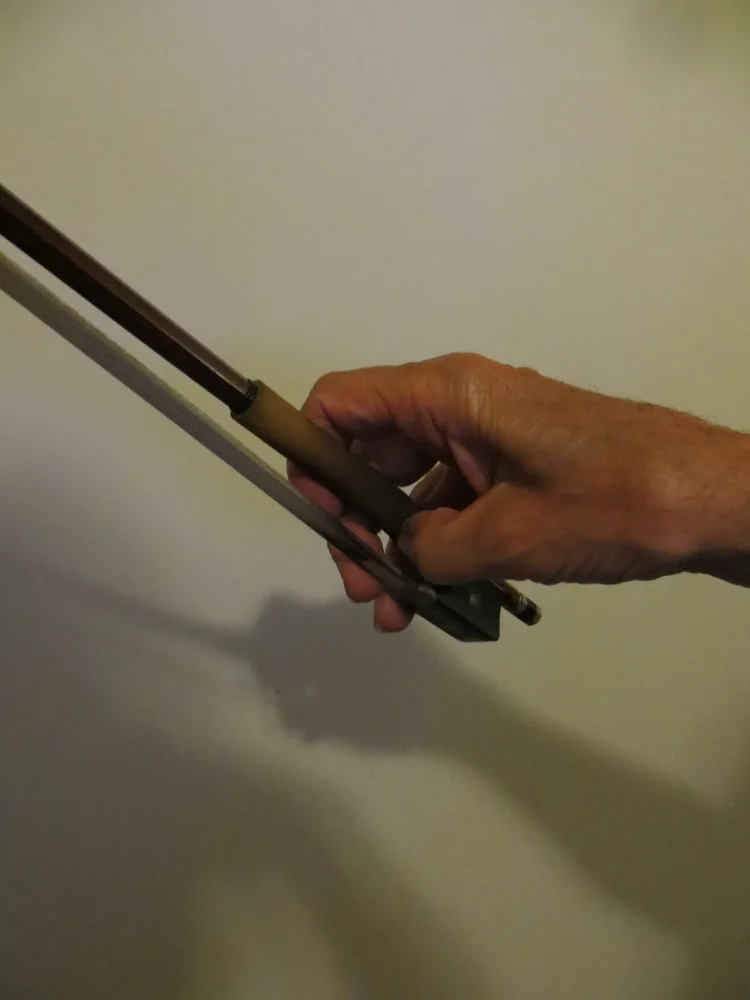
Photo 5
Students often counter with the argument that they need to squeeze the bow in order to put weight into the stroke. The weight essentially comes from the fingers on top of the bow: at the frog, hand tension should be negligible, although at the tip some counter-use of the thumb is required but overall much less than many cellists actually use. And, very importantly, it is not constant. (See The Cellist No. 1 for more detailed grip photos and suggestions)
Elbows

Photo 6

Photo 7
The position in which we place ourselves when we play the cello has much to do with our health. Photo 6 shows both elbows in good playing position. Try sitting like this, letting gravity take your elbows where they want to go. Now slowly raise them to the height shown in photo 7 paying attention to any tension or strain being felt in the arm muscles. If you're aware of your body, and most people are, you should be able to feel a pull or strain or tension in your upper arms as soon as your elbows are higher than where gravity wants them to be. Either elbow in this position, especially constantly, will put strain someplace between your elbow and shoulder.
Let's first look at the right elbow. Certainly some elevation above the natural gravity position is necessary to play the D and especially the A string. There are ways, however, to minimize this elbow height. A cello truly properly set-up will have the A-string side of the fingerboard higher than the C string side which serves to both give the A string a bigger sound (due to increased pressure on the top) and it makes playing on the A easier for the very reason we've been talking about: it requires less elbow elevation. Most cellos however aren't set up this way: to check, lay your cello on its back on a soft surface, take 6 inch straight-edge and butt its edge against the underside of your fingerboard (photo 8).

Photo 8
Look at it with your eye near the tailpiece. The straight-edge should slant upward toward the treble side (this one doesn't). Correcting this usually means an expensive new fingerboard so it probably isn't practical, but if you're looking at purchasing a different cello, it's not a bad idea to check this out. Also your cello set-up often includes a noticeable string height difference between the A and C strings: the C string being 2-3 mm higher, making it even more necessary to raise the right elbow. For sure, the C-string has a bigger amplitude of vibration (it "flaps" more) than the A, but many cellists find that their C string doesn't have to be as high as it is sometimes set in order to eliminate it from slapping on the fingerboard.
Another cause of a high right elbow is a bow stroke that goes for power generated the wrong way. When we're playing a forte passage, there is often a tendency to elevate the right elbow and push down on the bow to increase weight on the strings as in photo 9.
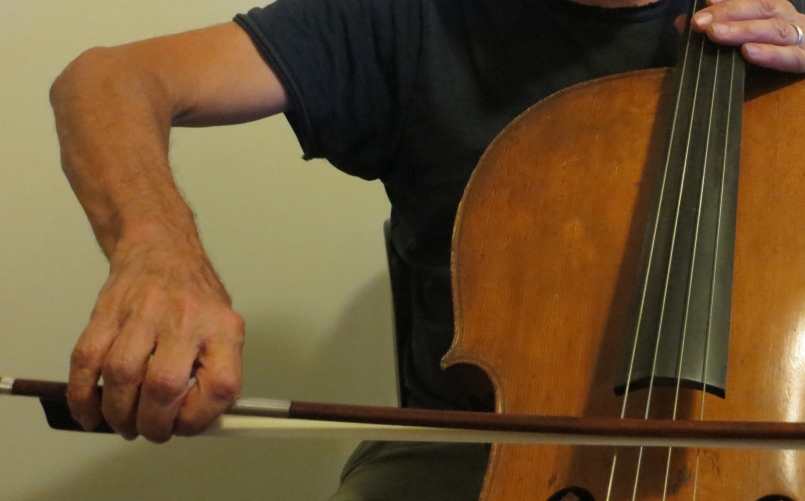
Photo 9
Increased weight is essential for big passages, especially as the bow gets closer to the bridge, but this weight can be added by pulling down (see photo 10) rather than pushing. Pushing creates a significant strain on the elbow and can easily lead to a tendonitis that may take a long time to heal.

Photo 10
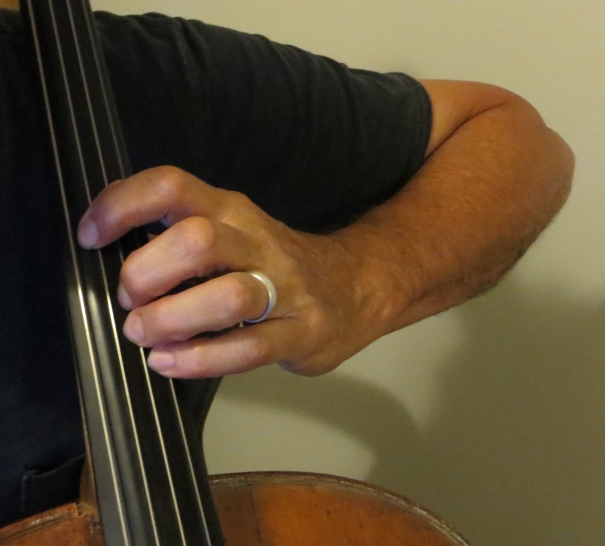
Photo 11
The same misplacement of the left elbow - that is: too high - can lead to a similar injury on the other side. Photo 11 shows the left elbow in a strained position, and one that is more common among beginning and intermediate players than you might expect. Notice that this elbow height causes a concave curve with the left hand (at the wrist) putting strain in this area as well.
Shoulders
Shoulder injuries have many of the same causes as elbow injuries - that is, the things mentioned above can also result in shoulder pain: it depends somewhat on what your weakest parts of these areas are. I once had a student who injured her rotator cuff doing something unrelated to the cello: the result was that she could still play the cello but only with that part of her body in natural playing position demonstrating, if it were necessary, that most of our bodies can remain pain free if they're treated properly, even playing several hours of cello each day. Once again the elbows need to be in the place where gravity wants them to be.
Many cellists, when tense, tend to hunch their shoulders up around their ears with the long term effect of causing shoulder pain, as most are unaware that this is happening and thus this position continues almost constantly.
Neck and Back
Today's cello position uses a longer endpin resulting in a more slanted angle of the cello than was true a few years ago. Many older performing cellists, now retired, held the instrument more upright and leaned over it the entire time they were playing. It's not surprising that pain was often the reason for their retirement. Photo 12 shows today's more ergonomic position - notice the slant of the cello, the neck low, near the shoulder as that's where gravity wants to take the left hand. As the cello is laid out in front of the cellist, there is little need for bending forward.

Photo 12
A cellist who was also a physical therapist came up with an excellent way to tell if your sitting position is in balance: with the cello in position, totally relax your body as if you were about to fall asleep and see which way you would fall: forward, backward, sideways. If you would pretty much stay in place, you're golden. Adjust your position until you can achieve this equilibrium.
But even more important, you need to move your back and neck regularly as you play. If these things stay in one place, no matter how ideally positioned, you're going to feel it.
Stretching
It sounds funny to some cellists when anyone suggests stretching before practicing or performing. "I'm neither a linebacker nor a power forward," someone once remarked. But considering what we do, we are athletes, and we will stay healthier if we prepare like one. Stretches I like involve a broom-handle centered on the back of my neck with my arms looped over it from behind: slowly rotating both horizontally and vertically. Squeezing a small, semi-squishy exercise ball helps warm up my fingers and thumbs and just plain feels good. There are many more, and there are stretching books and websites everywhere, but these two are a good start.
Healing
If you are already injured in some way that affects your playing - and probably many of you are if you've read this far - some steps toward healing are these:
1. If you have coverage or can afford it, see a doctor, one who knows about these things, for a diagnosis and possible medical treatment.
2. Study your body's use as you play the cello. Watch yourself in a mirror and compare your position to the photographs presented here. You can take all the pain medicine and physical therapy you want but it won't help if you're still aggravating your injuries. Remember, as much as possible you want to play in a position that uses your body in a way that your body wants to be used.
3. As you are correcting your body use, play a little less, or stop for a while (almost impossible for many cellists) to allow some healing.
4. If you're using over-the-counter pain medicine, take it in advance of your playing.
5. Monitor, in an almost obsessive way, any tension you feel in your body. Your default playing position at this point will always be to the old, destructive way. If you can learn to sense tension the instant it occurs, you can gradually correct the body use that is causing pain and make your default positions the correct ones. It's neither easy nor quick, but it is possible.
Finally, even if you are one of the lucky cellists that, no matter how much you play and how incorrect your use, you are injury free, realize that eliminating tension is a huge ingredient in really fine cello playing. You can improve your playing dramatically with tension-free use.
Our next topic will be: How to Play Fast!