The Cellist
Issue #5
Shifting: Smooth, Accurate and Secure
A common story from students over the years has to do with parts of a performance that didn't go well: and a large percentage of those parts had to do with the difficulty of completing a shift. Most cellists have, at one time or another, been in a performance-type situation and, knowing a difficult shift was imminent, suddenly became tense and tentative, closed their eyes, hoped for the best, and then missed it by as much as a quarter tone. Later ruminations would deal with thoughts like "1. there is exactly one infinitely thin point where my finger can land and be accurate: 2. any distance landed to either side of that point, no matter how small, will make the note inaccurate: 3. my hand is traveling almost 8 inches to get where I need to be, which may as well be 8 miles: 4. my high-school probability class taught me that the probability of success here is the fraction whose numerator a) is the amount of distance on which I can land and be successful - which actually is zero since it's a thin point not a distance - divided by b) the amount of distance within which I can plan on landing on a good day - I ought to accurate enough to hit a 2 inch long target - which is 0/2 which means I will never ever accurately hit that shift".
Actually cellists nail shifts all the time, including impossible-seeming long ones. So students inevitably wonder "is there some secret known only to great performers, not available to the rest of us because we don't belong to the club"?
This issue outlines a plan in points that, if practiced regularly, will enable you to be accurate enough with shifting that you won't ever have to fear it. I doubt that any parts of it are a secret although I don't know a lot of teachers who use all of these: it's not instantaneous, it requires daily practice, for many it involves dropping old habits immediately and never returning to them no matter how tempted, and it involves time, since it always takes time for the brain to truly assimilate new skills.
1. Always collect the fingers before shifting, and don't un-collect them until after you've completed your shift. Let's say your first finger is on E on the D-string (1st position), and you're going to shift to a fourth-finger C on that same string (4th position). We'll call E your "departure note" and C your "arrival note". Sorry about the travel-industry lingo. Before shifting to the C, collect all the fingers (group them together in a relaxed way) near the departure finger (1st finger) - see photo 1.

Photo 1
The reason for this is not that it moves the fingers closer to the arrival note: in this case it doesn't although in some cases it will. It's that the accuracy of anything we do on the cello is compromised if there is any part of our bodies - especially our hands - that is tense. If our hand is in the "block" (see photo 2),

Photo 2
there is actually a great deal of tension in it. {Try this: let your left hand hang down by your side in as a relaxed state as possible. Breathe deeply a few times until you are quite conscious of the relaxed state of your hand and fingers. If you look down at your hand, you will notice that your fingers are together and curved. Now very slowly spread your fingers and determine the point where you feel any tension in your hand. As you become aware of what tension really feels like, you will begin to experience tension the moment your fingers begin to spread.} After arriving at the 4th finger C, you can then spread your fingers to play any upcoming notes in that position. This works even at speed.
2. Keep your finger(s) on the string(s). If you are playing 1st position E on the D string and shifting to 4th position C on the same string, keep your first finger on the string as you shift until your fourth finger is down, ideally before the arrival. If you are playing that same E and are shifting to 4th position G on the A string, the principal remains the same: even though you are crossing strings. Keep your 1st finger on the D string as you shift, at some point before arrival putting the 4th finger on the A string. At no time should your sound stop, and a slide is OK. You'll learn to control the sound of your slide to your advantage (slides sometimes enhance music) and it is always preferable to "airspace": i.e. no sound. For our purposes, all shifts are these "sliding shifts".
3. Always have your thumb in loose contact with the neck. Ideally, in the neck positions (1-4) the thumb is on the neck somewhere underneath an area between the 1st and 2nd finger (see photo 3).
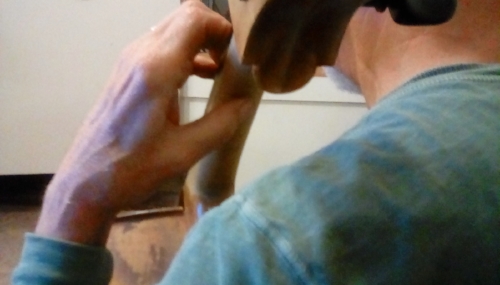
Photo 3
This is true whether the fingers are in the block or collected around and individual finger. When you shift, believe it or not it is the thumb, not the fingers, that senses where you are. One of my teachers who was fascinated by the human brain, learned that the thumb has a location-sensing power that is greater than the other four fingers combined. Even if we don't actually feel it when we play, accurate shifting would be far more difficult without the thumb.
4. Never reach for notes while shifting. Given what we've discussed so far, this seems obvious, but I've watched many cellists extend their fingers as they shift hoping, I guess, not to fall short of the mark. Always keep the fingers in a relaxed, collected state as you shift. An extension is a stretch, or reach, made possible by the extra spreading of fingers 1 and 2, but it never occurs while shifting. Always make a conscious decision to extend, or a conscious decision to shift, as there are lots of situations where you have a choice between the two.
5. It helps tremendously if you know what the arrival note sounds like before you shift. If you've worked on a piece or etude or scale very much, you are likely to have the pitch of the arrival note in your ear before the shift occurs. If you are sight-reading it's a little more difficult, although the more you sight-read, the more you can hear intervals (the note you just played vs. the upcoming note) as you read them. It's sometimes amazing to cellists to discover that even their exceptionally long shifts are often successful simply because they know what pitch they are aiming for.
6. Know what distance you're shifting. If your 3rd finger is on D on the G-string, and you want to shift so that your 1st finger is on F on the D-string, it helps tremendously to know how many half steps you need to move your hand. In this case your 1st finger (your arrival finger), if placed on the D string (the arrival string), would be on G. G is two half steps above F, and so you would need to shift down (in pitch) exactly two half steps. The more your brain knows about your shifting situation (i.e. arrival pitch, arrival string, arrival finger, the name of the arrival note (F in this case), distance in half-steps to travel etc., the more secure your shift will be.
7. In shifting to fourth position, there is a temptation, and common error, of sensing your arrival place with the heel of your hand contacting (in many cases bumping) into the rib and top edge of the cello (see photo 4).

Photo 4
Many older cellos that come through our shop have noticeable wear in this area. There are two reasons not to do this. First you will be much more consistent and accurate if you sense your location with your thumb. And second, in order to contact the heel of the hand against the cello, your hand must necessarily be in a position low enough that you would run into the cello on your way to any higher position. It's important to always have your hand in a position high enough (see photo 5)

Photo 5
to go to anywhere on the fingerboard and to finger your notes from a place more directly above them. Actually a third reason is that your audience is probably not going to enjoy a thumping sound every time you shift to fourth position
8. Don't rush your shift. This will mean you have tension in you body, or it will actually cause tension and in either case produce a large, unwanted accent and probably a note played slightly early and inaccurately. Practice relaxed, medium-speed shifts.
9. Make sure you don't speed up your bow in the process of shifting. A surprising number of intermediate cellists move their bow at the same speed that they move their left hand that is in the process of shifting.
10. Go for it! (without rushing). If you are tentative because of fear, even if you are lucky enough to land on the arrival note accurately, it will sound, at best, as if you were indeed afraid of the shift and the resulting tone will seriously detract from any musicality. A confident shift in tandem with a confident bow is always more successful.
11. Practice things (pieces, etudes, etc.) that use 2nd and 3rd positions. Many intermediate and even advanced cellists, when playing in the neck positions, rely too heavily on first and fourth positions. The resulting shifts (1st to 4th or 4th to 1st) are often much longer than they need to be, making the smooth flow of music much more difficult to achieve, and these long shifts sometimes end up arriving at a note that would be more musically appealing if you could keep it from occurring at the end or middle of a shift. It is usually much easier and smoother to make 2 or 3 small shifts instead of one long one. The problem is that first position is always comfortable and fourth position is the one place on the neck of the cello where you have a physical reference point. Hence the temptation to rotate between these two positions.
12. Most cellists find shifting more comfortable and relaxed if the strings of the cello are at a reasonable height (4.5 mm or less above the end of the fingerboard at the A string, 6.5 mm or less at the C string) and the fingerboard is planed more flat than concave from end to end.
Shifting to, and in, higher positions.
The above principles all apply to shifting to, from and within places above fourth position, with the exception of the location of the thumb. Photo 6 shows the thumb along the neck which works for positions 5-7, and photo 7 shows the thumb in positions 8 and above.

Photo 6

Photo 7
1. Practice scales and etudes that use higher positions. 2-octave thumb position scales starting on the C string are excellent. Early violin pieces from the Suzuki and similar repertoires are also good. It's much easier to shift to these positions if you know what it's like to play there.
2. The arrival note should be fingered with the second knuckle close to directly above the note, again not reaching for it.
3. The thumb, while riding on top of the strings (look back to photo 6) is still the locator for your shifts and needs to be in contact with those strings.
Shifting, like everything else we do on the cello, is most successful when we practice regularly, monitor our sound and are as tension-free as possible.
Like most of the other subjects in these pages, shifting is a mechanical skill and for your best possible performance the mechanics must be thoroughly practiced until they are second nature, something you don't think about when you do them. But a great performance is more than a set of well-honed mechanical skills. It is an organic presentation: your interpretation of a musical story written by the composer. The mechanics are in service of this interpretation, but mechanics on their own are not what moves an audience. In everything you practice, even as your mechanical skills are in process, play with beauty, passion and your best possible sound.
In the next issue we'll discuss Performance Anxiety: Some New Ideas on Something Everyone Faces.