The Cellist
Issue #1
NO. 1: YOUR BOW-GRIP AND YOUR BOW-CHANGE
As cellists we spend countless hours on things like intonation, vibrato, speed and other left hand techniques. Without question, out-of-tune or wrong notes, a stumble in a fast passage, or a bad vibrato will make it impossible for you to achieve the sound you want. But the ultimate tool to produce the sound that great cellists produce is your bow.
The Grip
a)fingers
It's important to realize that in all cello techniques, each of our anatomies is somewhat different: your final bow grip, even if you study with me privately and follow all my instructions to the letter, will not be exactly the same as mine. Recognizing this fact let's set some parameters. First, each bow stroke needs weight. Notice the use of the word "weight", not "pressure". "Pressure" implies a muscular exertion which, to some extent, is unavoidable; but our goal is to produce as much great sound as possible with the minimum amount of effort. Many players, especially at the beginning and intermediate level, can feel fatigue and pain from excessive, repetitive effort. Especially in the right hand.
Let's look at two categories of bow grips.
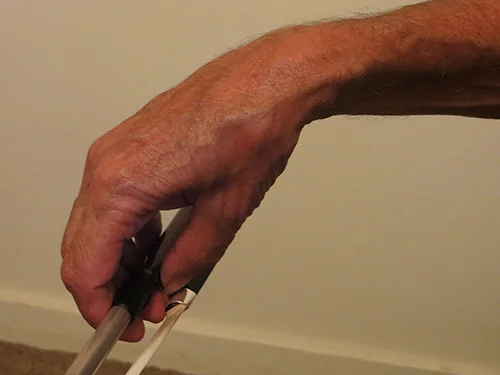
Photo 1
Photo 1 (above) shows what I call a "poster paper" grip: holding the bow the way you might hold a large piece of poster paper. In the photo I've exaggerated this grip for demonstration purposes, but notice the space between the top of the stick and the hand. If much weight is to be transferred from your arm and hand to your bow, the hand, and in particular the thumb, will need to squeeze the bow hard or it will slip. This grip may be possible with violin or even viola, but cellists need a lot more weight. Now we'll look at the second category bow grip in two stages.
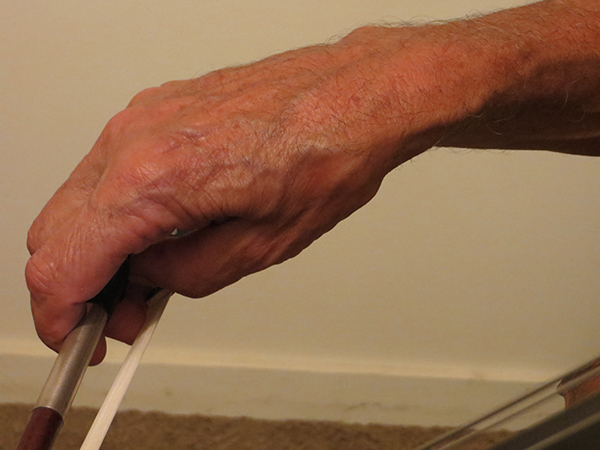
Photo 2
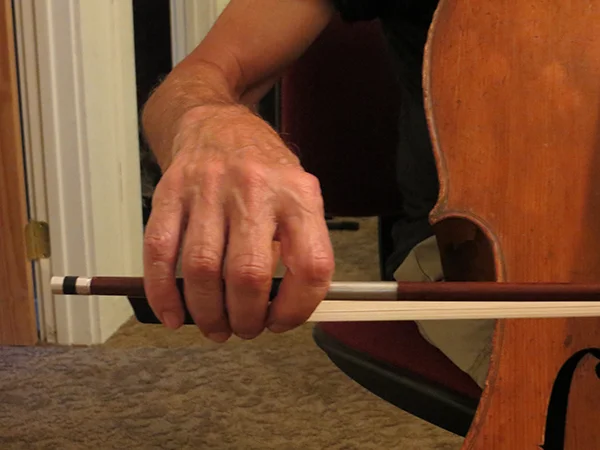
Photo 3
Photo 2 (above left) shows the fingers of the right hand (mainly the middle and ring fingers) essentially laying just beyond the top of the stick, and photo 3 shows the completed grip with the index and little fingers slightly spread. The physics is simple. When more weight is needed, no squeezing effort is necessary as the weight of the hand, and in fact the arm, is already sitting on top of the site where the weight is to be applied.
The advantages of this second category of bow grip are many. First the thumb, (which must be bent, by the way) is much less muscularly active - at the frog its main function is to keep the bow from tipping over - and the vulnerable joint where the thumb joins the hand is much less prone to the tendonitis and arthritis many cellists experience. Now note the position of the arm and elbow in photo 3. I like to think of this position as the place where your arm would end up if you fell asleep holding the bow. To be sure it will vary with each string, but try this. Sit with your cello and try a category-two bow grip with your bow on the D string about 1/3 of the bow-hair's length from the frog. Now try to get into a state of complete relaxation - almost falling asleep if you can - and let your arm and elbow go where they want to. This is an ideal place for them, as their natural weight will transfer to the bow without undue muscular effort.
Note that in photo 3, the fingers are slightly spread, and the index finger, which controls the transfer of weight more and more as you move toward the tip, is the most spread of all. Experiment with the distance between your fingers in your bow grip: your own hand will eventually adjust to the optimal spread for you.

Photo 4
Now that we have established a bow-grip design, let's see what it looks like (photo 4, right) as the bow moves. Since one bowing objective is to keep the bow essentially perpendicular to the string and moving in a straight line, the hand needs to change slightly as the bow moves toward the tip. In fact the hand changes continually with all bow movement. This keeps everything straight and in fact is an enforced relaxation of the right hand as it must remain flexible. A right hand "frozen" on the bow will promote unavoidable tension.
Practice suggestion: sit in front of mirror (or a window at night) and practice slow long-bows watching in your reflection both your right hand and the path of your bow as the stick travels. Does the right hand continually adjust? Does the bow travel in a straight line?
Bow suggestion: some cellists find it more comfortable to grip a bow with a section of latex (or similar) tubing over the grip, wrap and "blip" of the frog (see photo 5 below). Use 3/8" inside diameter with 1/16" wall.
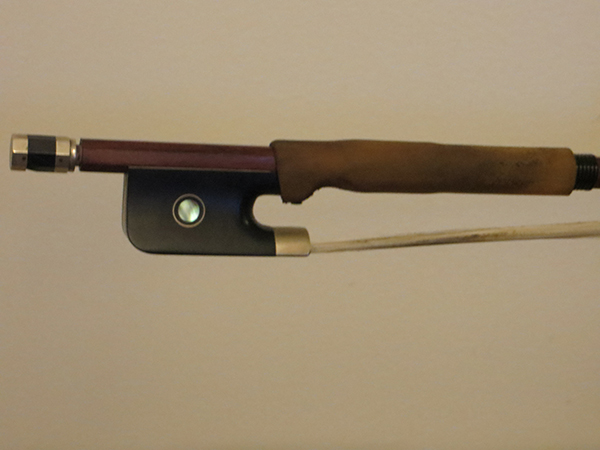
Photo 5
b. The Bow-Change
Here's how the right hand works on the bow-change, once you've gotten the proper grip. You may have watched dozens of different performing cellists and fixed your attention on their bow change, but when you tried to copy their movements the result was not what you wanted. So let's state a few simple rules.
1. A bow change is a simple change of direction. Period. You don't need a dipsie-doodle wrist flick or arm rotation; in fact extraneous motions will likely serve to make your bow-change less effective.
2. The looser and more relaxed your hand is, the smoother the change will be. Your hand should remain flexible on the bow, especially at the change.
3. DON"T LET UP YOUR WEIGHT AS YOU APPROACH AND GO INTO THE CHANGE. This is a more common problem than you might imagine. Some people truly believe that their "hiding" their bow change as they lighten it, others don't even realize that they're doing it.
4. You should hear a little "click" at each change. Even if you think it shouldn't be there, it is the sound of a good bow-change. Listen to recordings and pay attention to the number of "clicks"you hear: you may be surprised. This doesn't mean to accent the change, just make it firm. If, without improperly accenting, your "click: somehow becomes obnoxious, it's much easier to correct than is the dead space created by lightening the weight of the bow.
Practice suggestions:
1. Practice your bow changes on open strings with slow long-bows, 8-16 bows per string. Try closing your eyes and really listen to your change. Is there perhaps a lightening or lifting of the bow at the change? The sound should be solid through the change. Practice bow changes on open strings for at least 5 full minutes per day, all the time listening with a very critical ear.
2. If you have any kind of recording equipment, try recording yourself. If you've never done it before, you may hate your sound: but remember that only top quality professional equipment will do justice to the timbre of a cello. The recorder, especially a mediocre one, is a cruel but still very effective teacher. If your bow change is anything but first-rate, the recording will very effectively show you: in a way no teacher can.
In closing I'll state a second important rule (the first being that all each of our anatomies is somewhat different) which will apply throughout these publications: the human brain, no matter how brilliant, is capable of focusing on only one difficult task at a time. When practicing, isolate what you want to accomplish and don't try to accomplish anything else. For example, in practicing with long bows, practice focusing only on the path of the bow perpendicular to the string. Then practice focusing only on your bow change. Etc.
Our next issue will explore How To Bow For Sound.